Configuration of Fields and Workflows (Rich Client)
In this chapter you will learn more about the configuration of data fields for your aqua projects. You will receive information how to set the position of fields in the layout designer, how to configure workflows, and how to configure restrictions.
Every aqua project implements a template which defines the configuration of the project. By editing the template, you can customize the layout and the dialog fields for the following items: defects, requirements, test cases, test scenarios and scripts. There are two types of fields - predefined fields and custom fields. Predefined fields are configured by default and cannot be changed by aqua users. Custom fields can be added when additional fields are required for an individual specification.
Configuration of Custom Fields
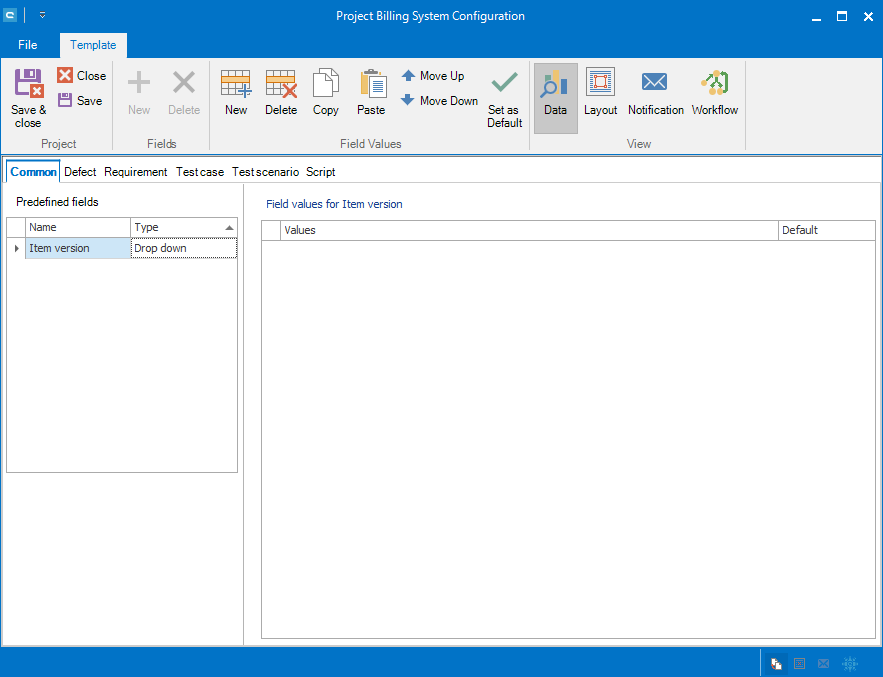
Select your project in the project browser. Using the right mouse button, choose the entry Project Configuration and then Template. A new dialog will open as like in the following screen.
Note:
The Names of the predefined fields and the available values for these fields depend on the selected language in aqua and project-specific configurations. Therefore, it is possible that names and values may differ from those in the screenshot.
Choose the tab Requirement and click on Custom fields. To add a new custom field, click on the New button in the fields panel in the ribbon bar. A new field of type Text with the preliminary name New Field will be created in the Custom fields area. Click on the name of the new field and change it to Description.
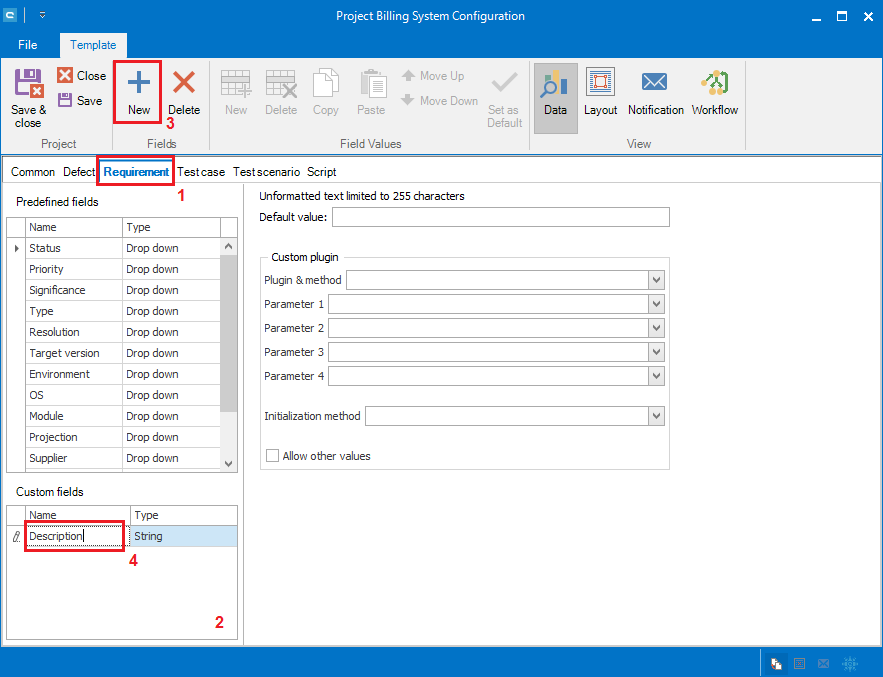
1. Click on the Requirement tab.
2. Click on Custom fields.
3. Click on New button in the fields panel in the ribbon bar.
4. Change name to Description.
The new custom field Description is now created. In order to be used the field needs to be placed inside the dialog. To do this, open the Layout Designer by clicking on the Layout button in the View panel in the ribbon bar. Click on the Requirement tab to place the new custom field Description into the Requirement dialog. The displayed toolbox contains all fields, that can be added to the dialog. Move the entry of the field Description via drag & drop from the toolbox into the layout. Hold down the left mouse button until the entry is at the desired final position. Further adjustments to the layout can also be made via drag & drop.

1. Click on the Layout button in the View panel of the ribbon bar.
2. Click on the Requirement tab.
3. Move the Description field via drag & drop from the list into the desired position into dialog
Click on the Save & Close button in Project panel in the ribbon bar to save the changes and to close the project configuration. The new custom field is now added to the layout and can be used by all project members.
Every custom field specifies a particular type of value it can contain. The available types are: Date time, Decimal, String, Drop down, Drop down (multiple choice), Text, User and User (multiple choice).
Type | Description | Example |
Date time: | Used for calendar dates and time. | Date the requirement was created |
Decimal: | Used for number values. | Points, euros, business values |
String: | Used for short text values. | Name |
Drop down: | Allows choosing one value from a list with predefined values. | Version, priority, significance |
Drop down (multiple choice): | Allows choosing multiple values from a list with predefined values. | Affected system, requested customer |
Text: | Used for rich text, such as comments, descriptions and pictures. | Comment, description |
User: | Allows choosing one user from a list with the existing users of the project. | Mainly responsible user, project manager |
User (multiple choice): | Allows choosing multiple users from a list with the existing users of the project. | Team members |
Configuration of a Workflow
In aqua you can create a workflow for your specific project. Click on the Data button in Fields panel of the ribbon bar. Choose the Defect tab. Click on the Status field in the predefined fields area and the field values for Status will be displayed in the table on the right. Click inside the table on the first value and click on the Delete button. Repeat for all values.
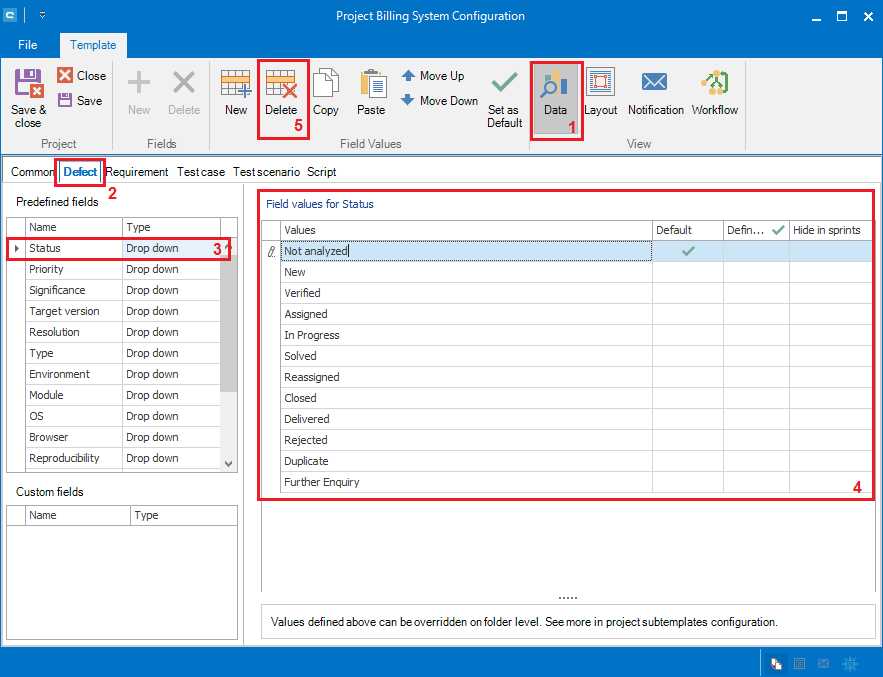
1. Click on the Data button in the View panel in the ribbon bar.
2. Choose the Defect tab.
3. Click on the Status field inside the Predefined fields area.
4. Click in table with field values for Status.
5. Delete the values for the status.
Click in the Field values for Status table and press the New button five times to add five new field values for the field Status. Click once in the value cell of each new value and rename them as: New, In Progress, Done, Test and Closed. Set checkmarks in Default at the value New, in Definition of Done at Closed and for Hide in sprints also at Closed. The checkmark for Hide in sprints is set so that the status Closed does not appear on the Sprint board in Agile. We have now created five values for the status of defects. To configure the workflow for the status, open the Workflow Designer button in the ribbon bar (5).
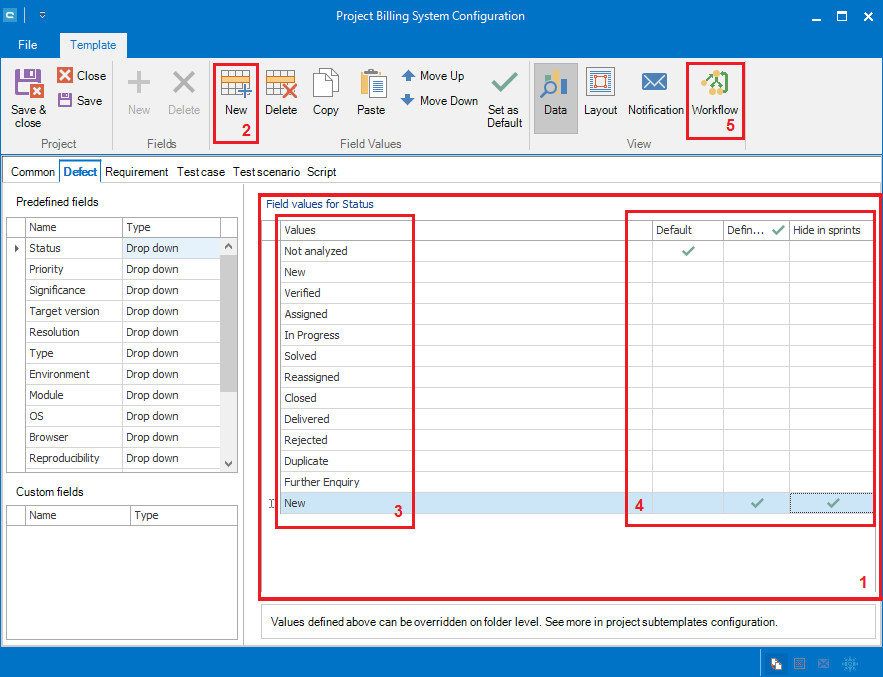
1. Click in the Field values for Status table.
2. Press New button in the Field Values panel of the ribbon bar.
3. Click inside the value cell of each new value to rename it.
4. Set checkmarks in Default, Definition of Done and Hide in sprints.
5. Open the Workflow Designer by clicking on the Workflow button in the View panel in the ribbon bar.
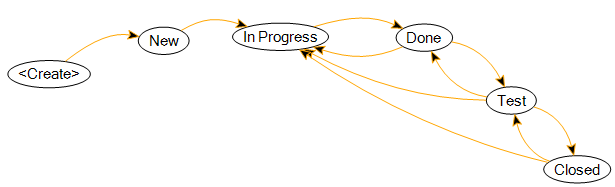
The following table describes the transitions for workflow that we will be implementing as an example:
New | In Progress | Done | Test | Closed | |
<Create> | yes | ||||
New | yes | ||||
In Progress | yes | ||||
Done | yes | yes | |||
Test | yes | yes | |||
Closed | yes | yes |
Note:
The Table of transitions is red from the left to the right.
As the Workflow Designer is now open, click on the Defects tab in order to specify the workflow for defects. Activate a workflow by clicking on Use Workflow button in Workflow panel in the ribbon bar.
When creating a new defect, we want it to have the initial status New. This is the transition between the nodes <Create> and New, which is automatically set as we previously defined that the default value should be New.
When, for example, a programmer starts fixing the cause of the defect, the only next possible status for the defect should be In Progress. In order to configure this dependency you need to create the transition between the nodes New and In Progress. To do this, slide the mouse over the edge of the New node, when the mouse cursor changes to a hand press and hold the left mouse button, drag the arrow to the In Progress node and release the mouse button.
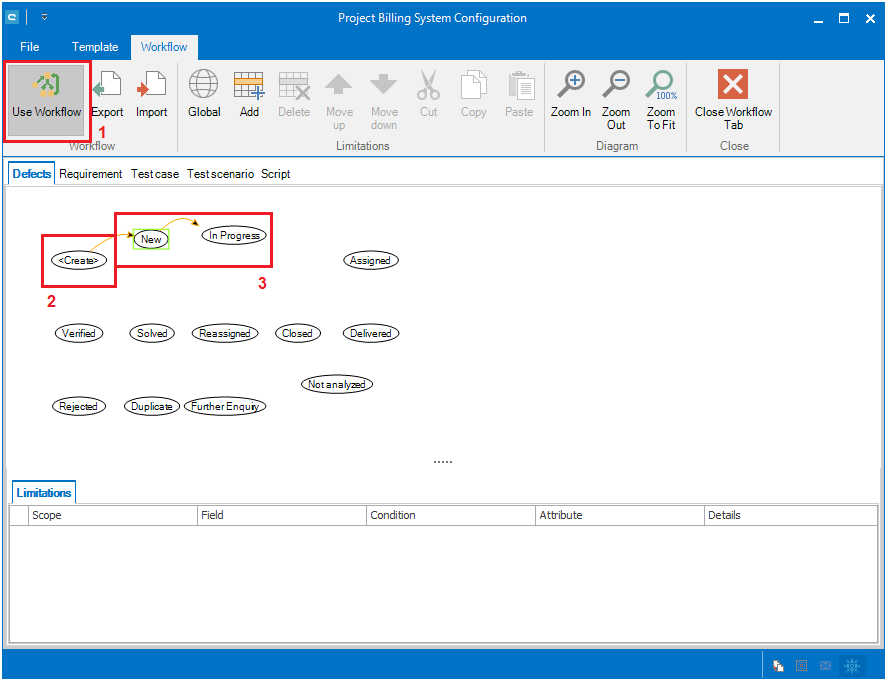
1. Activate a workflow by clicking on the Use Workflow button in Workflow panel in the ribbon bar.
2. Initiate the transition between the nodes <Create> and New for the default status value.
3. Create a transition between the two nodes.
Configure all transitions between the status nodes as defined in the table. This is how the complete workflow for defects should look:
The following types of limitations are possible: Global Limitations, which are defined for the whole workflow, Action Limitations for the transitions between the status nodes, and last but not least Status Limitations for a particular status.
To create a Global Limitation, click on the Global button in the Limitations panel in the ribbon bar. This is how the Global Scope of the workflow is selected. Then, click on the Add button in group sort Limitations to add a limitation. The new limitation is added in the table of the area Global for the global scope. The table has the following five columns: Scope, Field, Condition, Attribute and Details.
Scope: | Describes the extent of the area for the limitation. |
Field: | Specifies the field for which the limitation is applied. |
Condition: | Defines a particular user role for which the limitation should apply. |
Attribute: | Determines a property for the field for which the limitation should apply. · Hidden - the field cannot be seen. · Editable - the field can be edited. · Default Value - sets a default value for the field. · Highlight - highlights the field as outstanding and sets its background color to yellow. · Required - makes the field compulsory and sets its background color to red. · Value – differs depending on the type of the selected field in column Field. |
Details: | Depends on the type of the selected field in the column Field and the selected value in the column Attribute. |
Note: No limitations are possible for fields of type Text, as this is a type for rich texts.
Next, we want to configure the newly created Global Limitation for a particular use. We want that the field Name to be compulsory when creating a defect, for example. Click in the field column and choose Name from the list of existing fields. The Condition column should be set to For any role, because we want the limitation to be active for all roles. To make the Name field compulsory click in the column Attribute and choose Required. In this case we do not want to negate the value of Attribute, so the value of the column Details should remain to Is true.

1. Click on the Global button in Limitations panel in the ribbon bar to set the global scope of the workflow.
2. Then click on the Add button in Limitations panel to add a limitation.
3. Click in the Field column and choose a field from the list of existing fields.
4. Click in the Condition column and choose a role or a pool of roles from the list of existing roles.
5. Click in the Attribute column and choose a value from the list.
6. Click in the Details column and choose a value from the list.
To create an Action Limitation for a particular conjunction, click on the transition arrow and the Action table is displayed. We want that the field Assigned to, for example, to automatically resets its value to the user, which changes the Status of the defect to Tested. In order to do so, click on the arrow between the nodes Done and Tested and press the Add button Limitations table to add a limitation. The new limitation is added in the Limitations table under Action: Done to Tested.
Click in the Field column and choose Assigned to from the list of the existing fields. The Condition column should set the limitation For any role, because we want the limitation to be active for all roles. To set the value of the field, click on the Attribute column and choose Value. In this case we want to set-up the user who will changing the value of status, so click Details column and choose Current user.

1. Click on a transition arrow.
2. Press button Add in group sort Limitations to add a limitation.
3. Click in the value of column Field and choose a field from list of the existing fields.
4. Click in the value of column Condition and choose a role or a pool of roles from list of existing roles.
5. Click in the value of column Attribute and choose a value from list.
6. Click in the value of column Details and choose a value from list.
You can configure an Action Limitation in such a way that the Status can be changed only by the user of a particular role. We want the Status field can be set to Closed only by a user Project Administrator role for example. To create this limitation, click on the transition arrow and the Action table is being displayed. Click on the Action tab inside the table. Choose Only for selected role(s) and go to the table of existing roles. Find the role Project Administrator and tick the box.
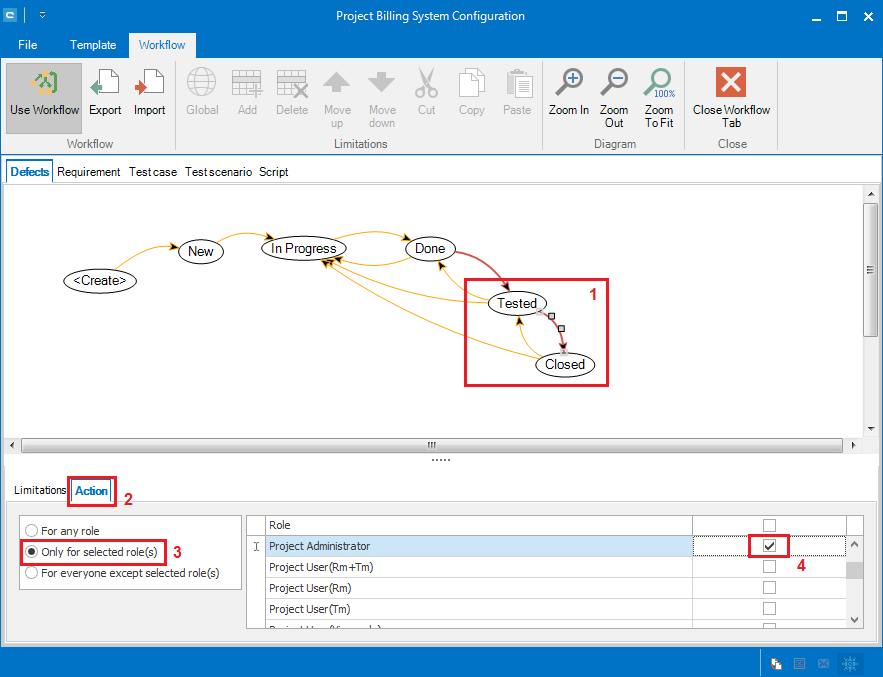
1. Click on the transition arrow and the Action table is being displayed.
2. Click on the tab Action inside the table.
3. Choose Only for selected role(s) and go to the table of existing roles.
4. Set a checkmark for the role required.
To create a Status Limitation for a particular status, click on the node of this Status. We want the field Priority to be highlighted only when the defect has the status New, for example. In order to do so, click on the New node and press the Add button in the Limitations panel to add a limitation. The new limitation is added in the Limitation table with the Status New. Click on the column Field and choose the field Priority from the list of existing fields. The value of the Condition column should set the limitation For any role, because we want the limitation is active for all roles. To highlight the field New, click on the Attribute column and choose Highlight. In this case, we do not want to negate the value the attribute, so the value of the Details column should remain Is true.
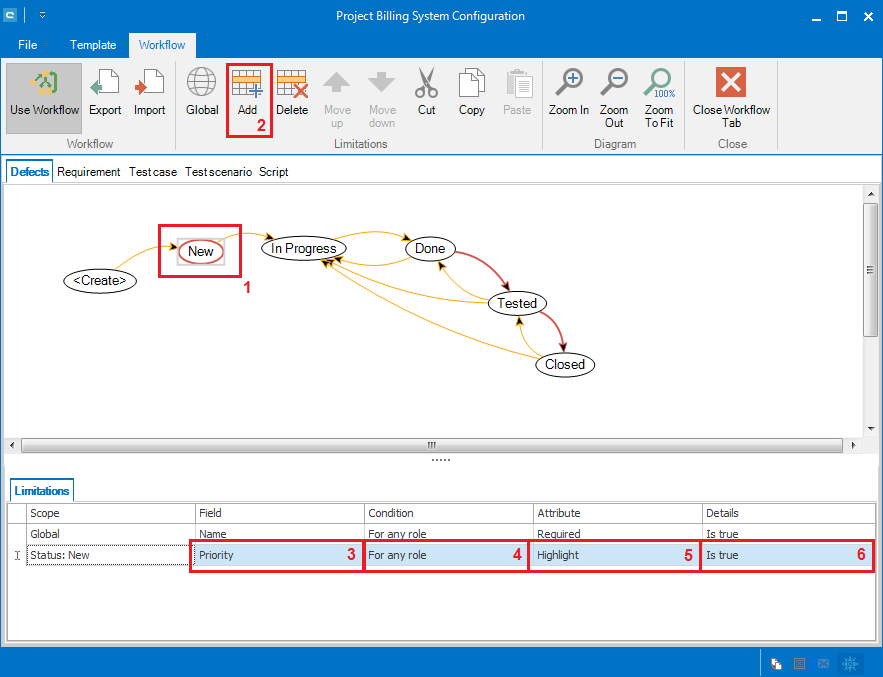
1. Click on the node with the required status.
2. Press Add button in the Limitations panel to add a limitation.
3. Click on Field column and choose a field from the list of existing fields.
4. Click on the Condition column and choose a role or a pool of roles from the list of existing roles.
5. Click on the Attribute column and choose a value from the list.
6. Click on the Details column and choose a value from the list.
Related Articles
Web Client vs Rich Client
Feature Additional Info WebClient Rich Client Homescreen x x Configurable Only on premise x User administration x x Roles x x Creation x x Project x x Usage statistics x SAML 2.0 x Project configuration x x Fields x x ...Import Project Configuration
Project configurations can also be exported and re-imported in other projects. Thus all configurations of fields, workflows, notification templates, field rules, etc. can be transferred. Cross-project information, such as users or roles, are not ...Template configuration
Every aqua project implements a template which defines the configuration of the project. By editing the template, you can customize the layout and the dialog fields for the following items: defects, requirements, test cases, test scenarios and ...Rich Client
System Requirements – aqua Rich Client Minimum software and hardware requirements are: Intel Core Duo 2x2Ghz, AMD Duo Core Processor 2x2Ghz or more 4 GB RAM or more 1 GB free hard disk space Windows 10, Windows 8.1, Windows 8, Windows 7 Microsoft ...SSL-Configuration
In order to enable a connection via SSL between aqua Rich Client and aqua Server, the aqua Server requires some additional configuration and an appropriate SSL-certificate. 1. Log In to your aqua Server 2. Open IIS Management Console 3. Select ...