Test Automation
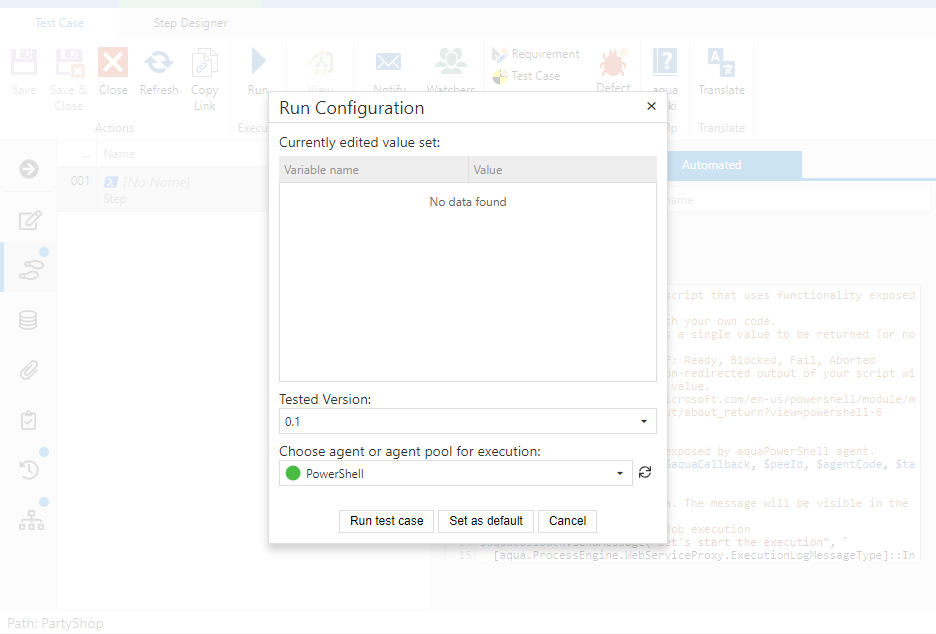
aqua allows to execute automated tests. The procedure to start an automated test is the same as for a manual test. You just click the Run button in a given test case. The following dialogue is supplemented with a section for Agent selection. The agent is responsible for executing the test. Red indicates that the agent is not available, green indicates an execution agent that waits for a task.
How to configure the agents for PowerShell and Unixshell as well as the Jenkins integration using the web client is described in the following chapters. To set up additional automation tools like Ranorex, JMeter or SoapUI or even database queries you have to use the aqua rich client. Please refer to the automation script of our rich client documentation for more information.
Creating an Automation Agent
To run an automated test case, a corresponding aqua agent must be configured. Each agent has an individual access code. The code is generated in aqua and assigned to the agent.
The agents can then be installed on any computer as long as there is a connection to the aqua server. The agents then simply communicate between aqua and the respective automation tool, start test executions and return the results back to aqua.
Retrieving an Access Key
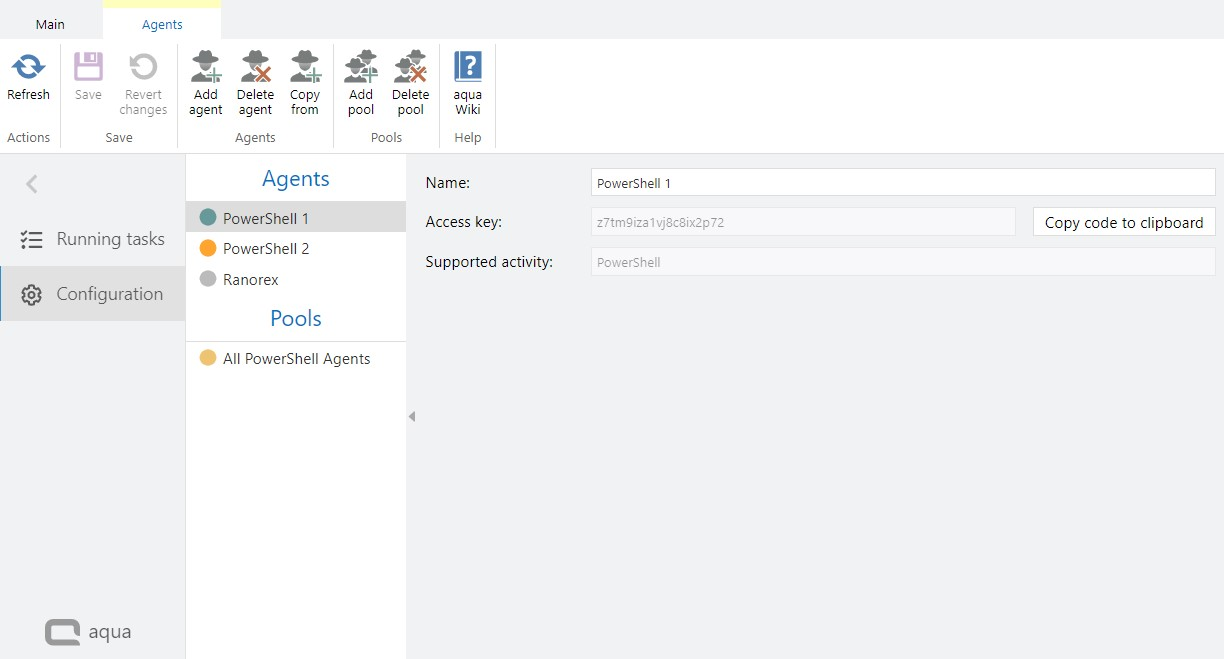
To retrieve an access key, select your project in the project browser and click on the configuration menu in the upper left corner of the aqua header 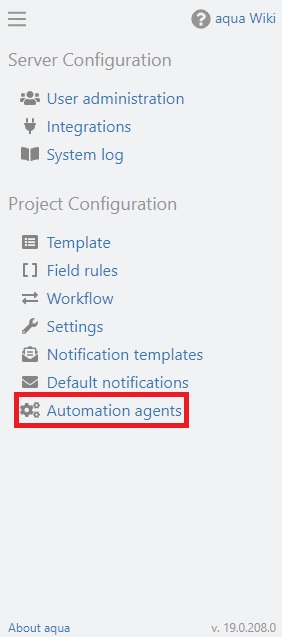
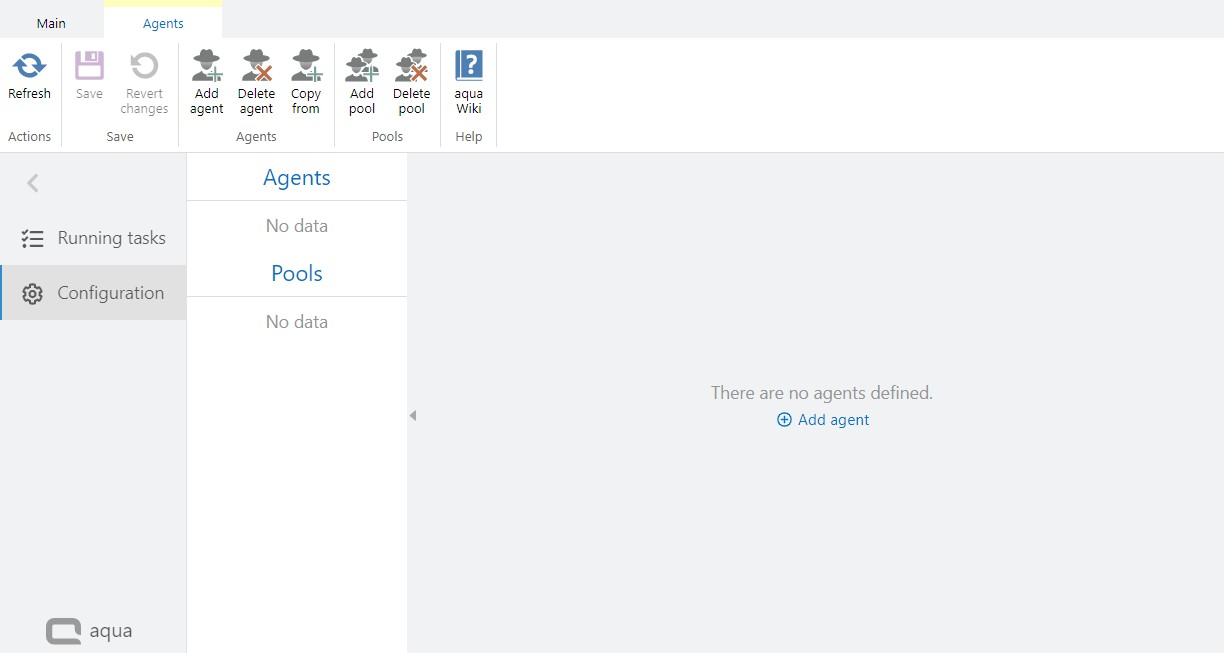
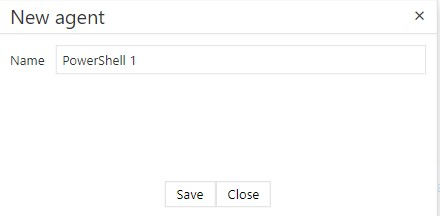
Click on Add agent in the ribbon and choose a name for the new agent.
An access code is automatically generated and is required for configuring an agent successfully. To do this, copy the access code to the clipboard or write it down for later use. The access code is used as an identifier to distinguish several agents properly. You must never configure two agents with the same access code.

Configuring an agent
The access code is required for the configuration of the agents. It must be included in the config file of the corresponding agent.
The config file can be found in the same folder where the agent is located, e.g. the aquaAgentPowerShell.exe.config for PowerShell or aquaAgentRanorexGui.exe.config for Ranorex.
The generated access code must be entered into this file. In addition, further configurations can also be made in this file, depending on the respective agent type. In addition to the agentCode, the aquaServiceUrl is also important in most agents (the correct link can also be found on the aqua landing page in the agents section). The correct aqua server name or server IP address must be entered there.
The corresponding positions are shown in the following excerpt using the PowerShell agent as an example:
<?xml version="1.0"?>
<configuration>
<appSettings>
<add key="agentCode" value="84f0voteb5xtym56p4lc" />
<add key="aquaServiceUrl" value="https://aquaServerName/aquaAPI/aquaagentwebservice.asmx" />
<...
</appSettings>
...
...
</configuration>
If you have configured the agent correctly, you can start the agent via the exe file. In the window that then opens, the connection status and other log messages are displayed.
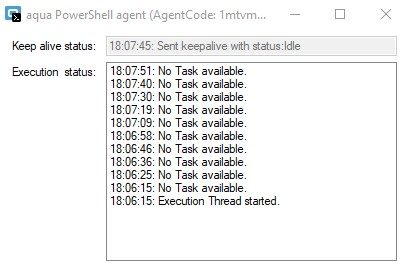
In the Automation agents section in aqua, a green dot is displayed for this agent if the connection is successful (the view may need to be updated once). If no initial connection can be established, the dot is shown in gray. If a connection has been established at least once, but now there is no more connection, an orange dot is displayed. If there is no connection, check if the agent was started, if error messages are displayed in the agent and if there is a connection to the aqua server at all. To run an automated test case with this agent the agent must be started and configured correctly.
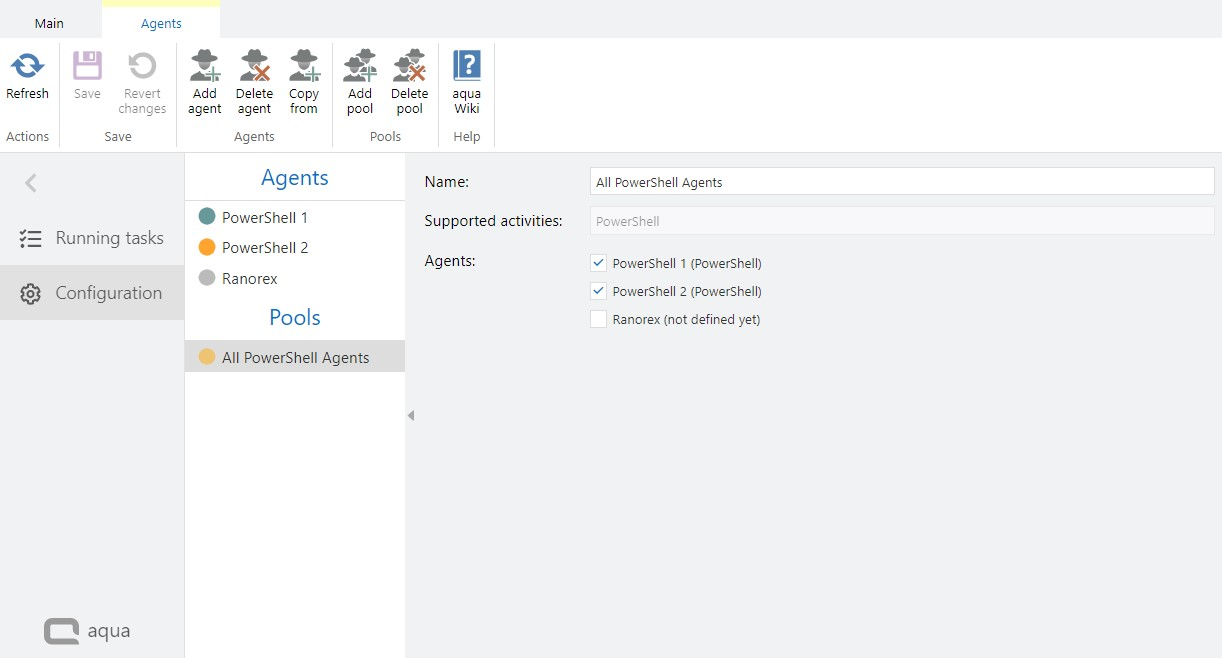
Agent Pools
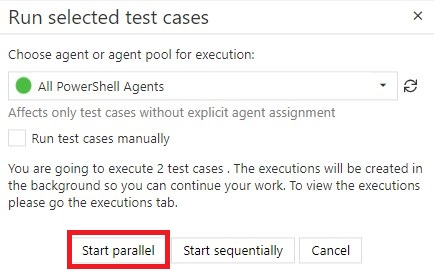
In the Pools section, you can create an agent pool containing multiple agents. This pool can then be selected during a test case execution or test scenario execution and uses the correct agents for the respective steps or test cases.
You can also distribute test scenarios with many test cases to several agents and execute them in parallel. This can be defined at the start of the execution.
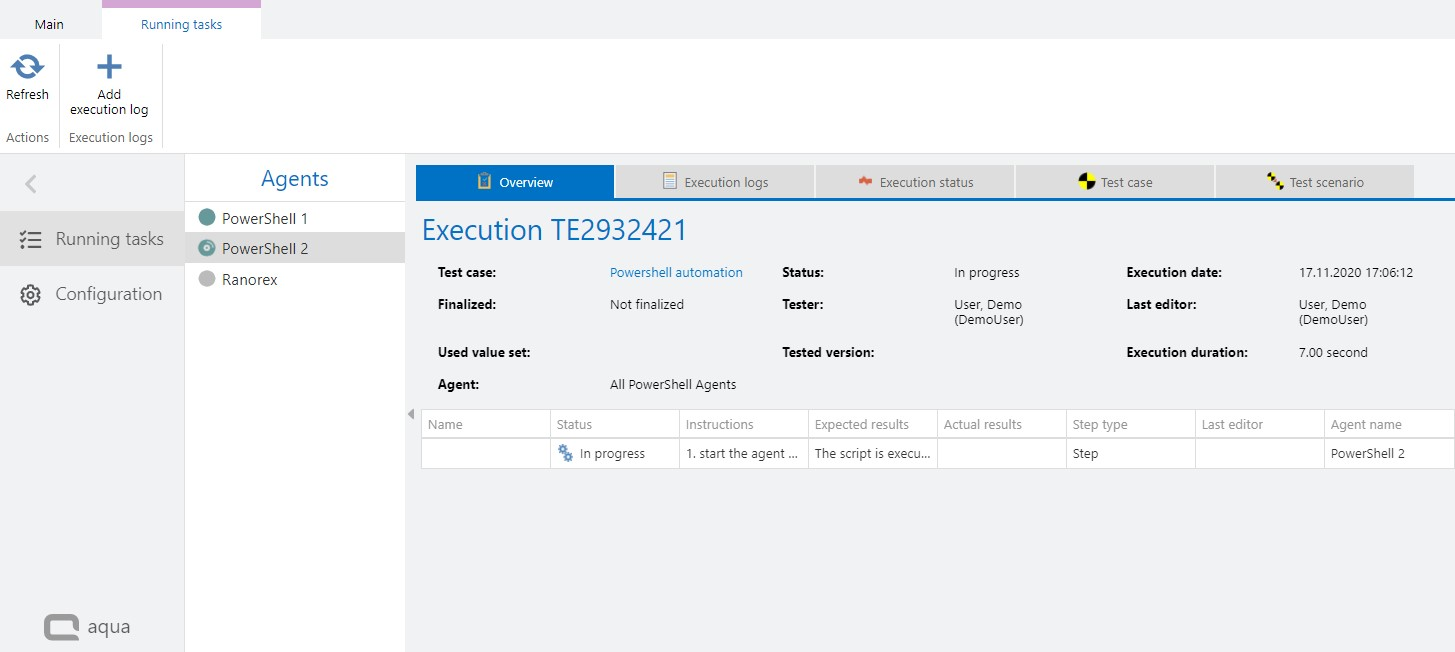
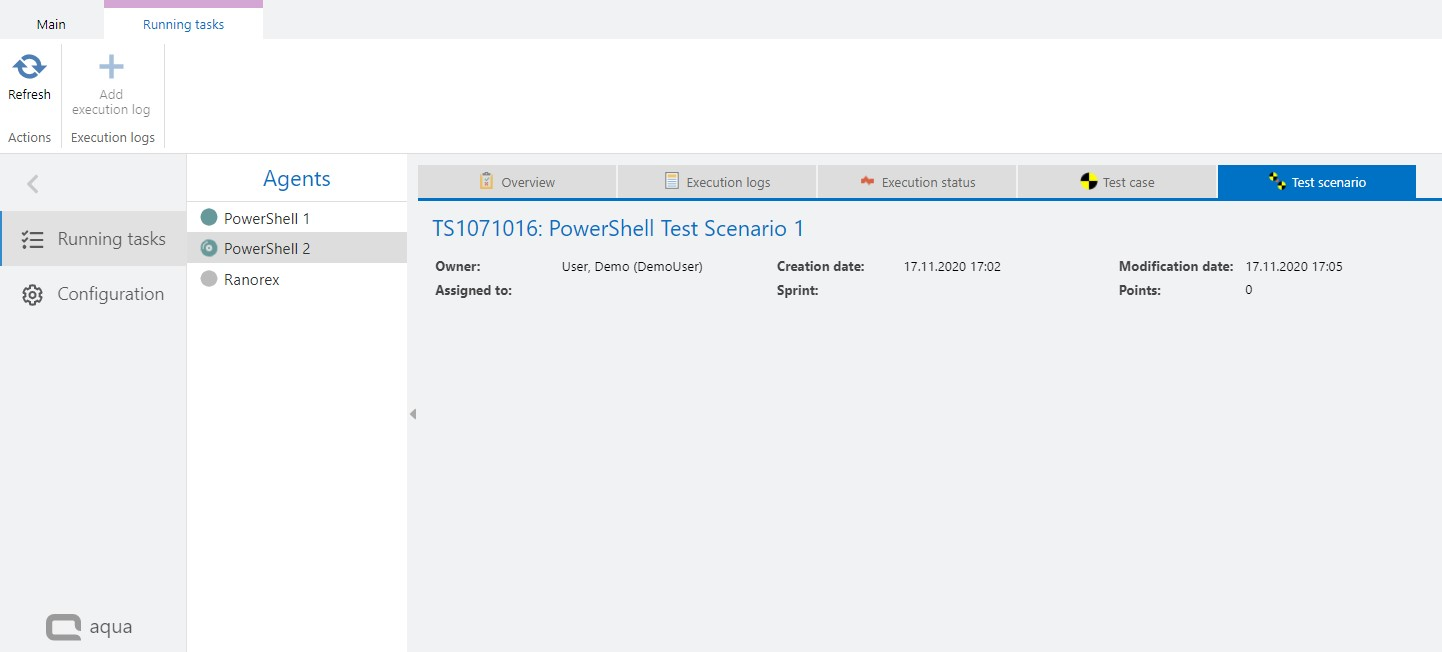
Running Tasks
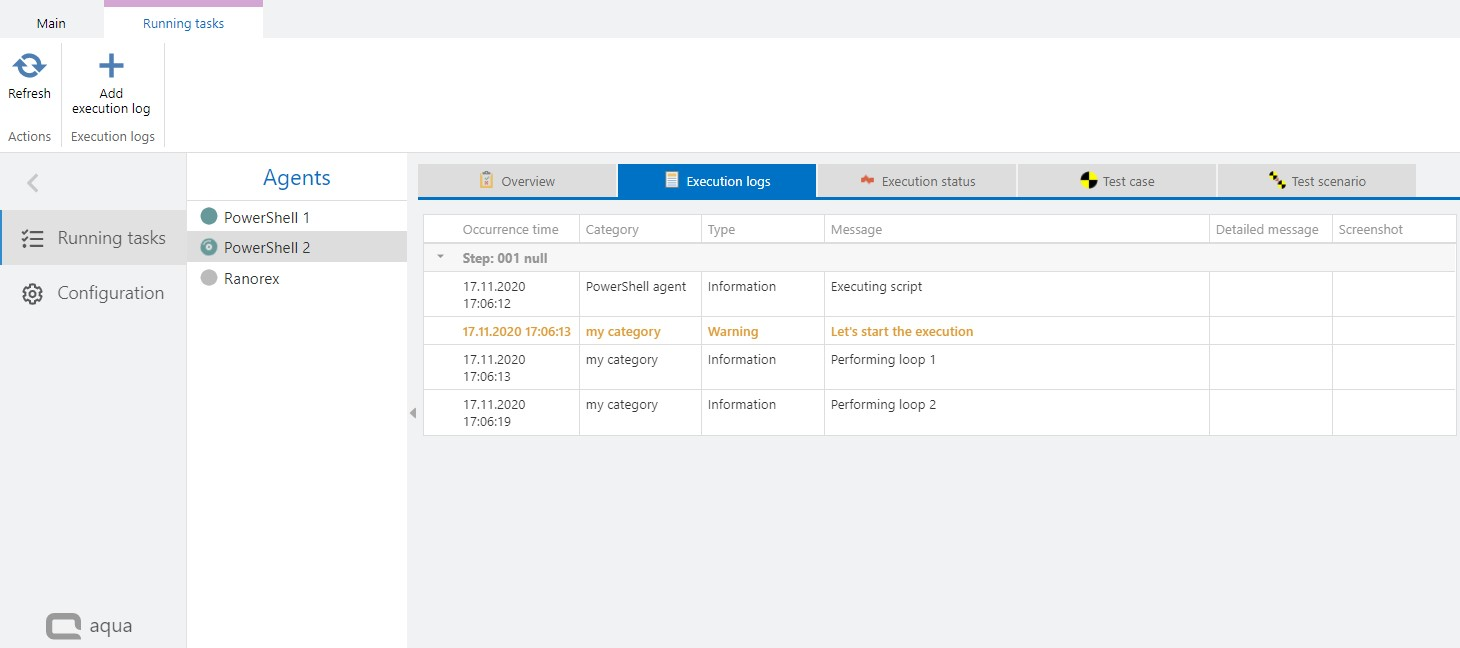
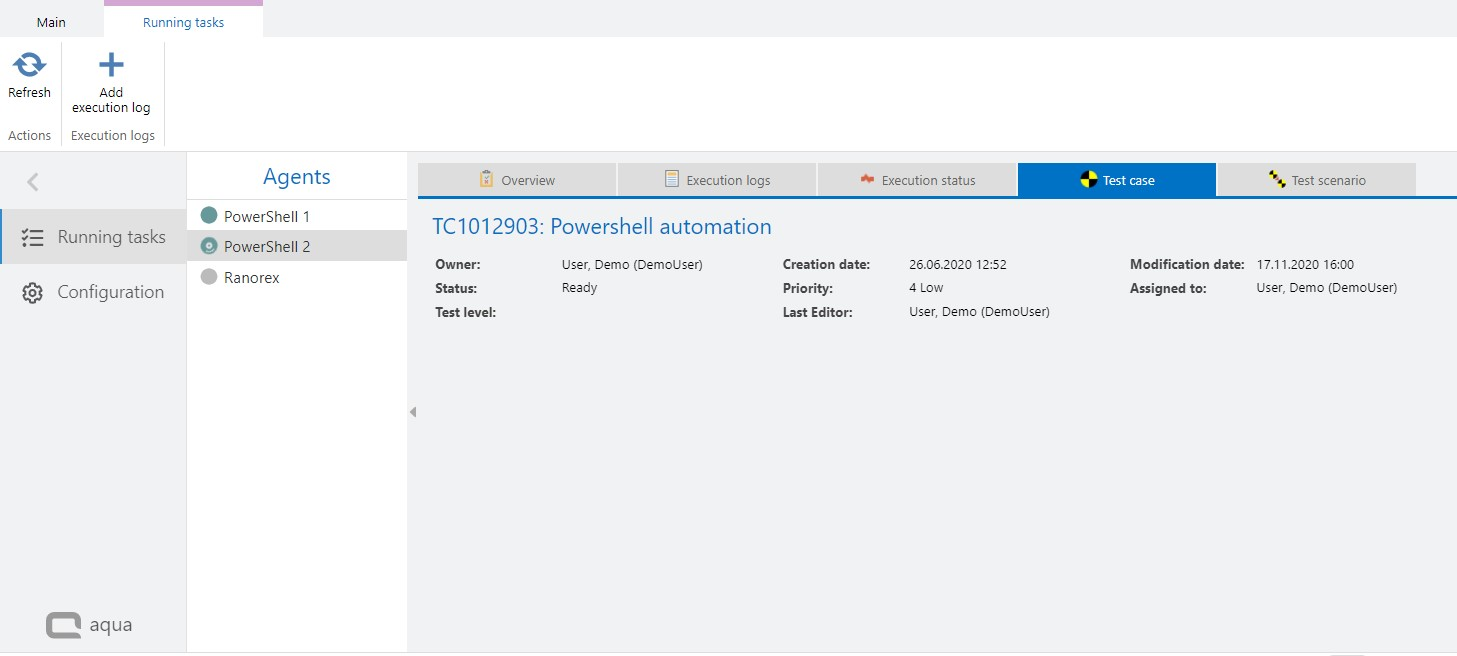
When an automated test is running, you can monitor the execution status by clicking on Running tasks. Here you can see the current status of your execution and the detailed execution logs or details of the test case or test scenario that is being executed. The execution logs can of course also be opened directly in the respective test case / test scenario during or after execution.
PowerShell
How to set up a PowerShell agent can be read in the chapter Creating an Automation Agent. The PowerShell agent is required for executing a test case with PowerShell scripts.
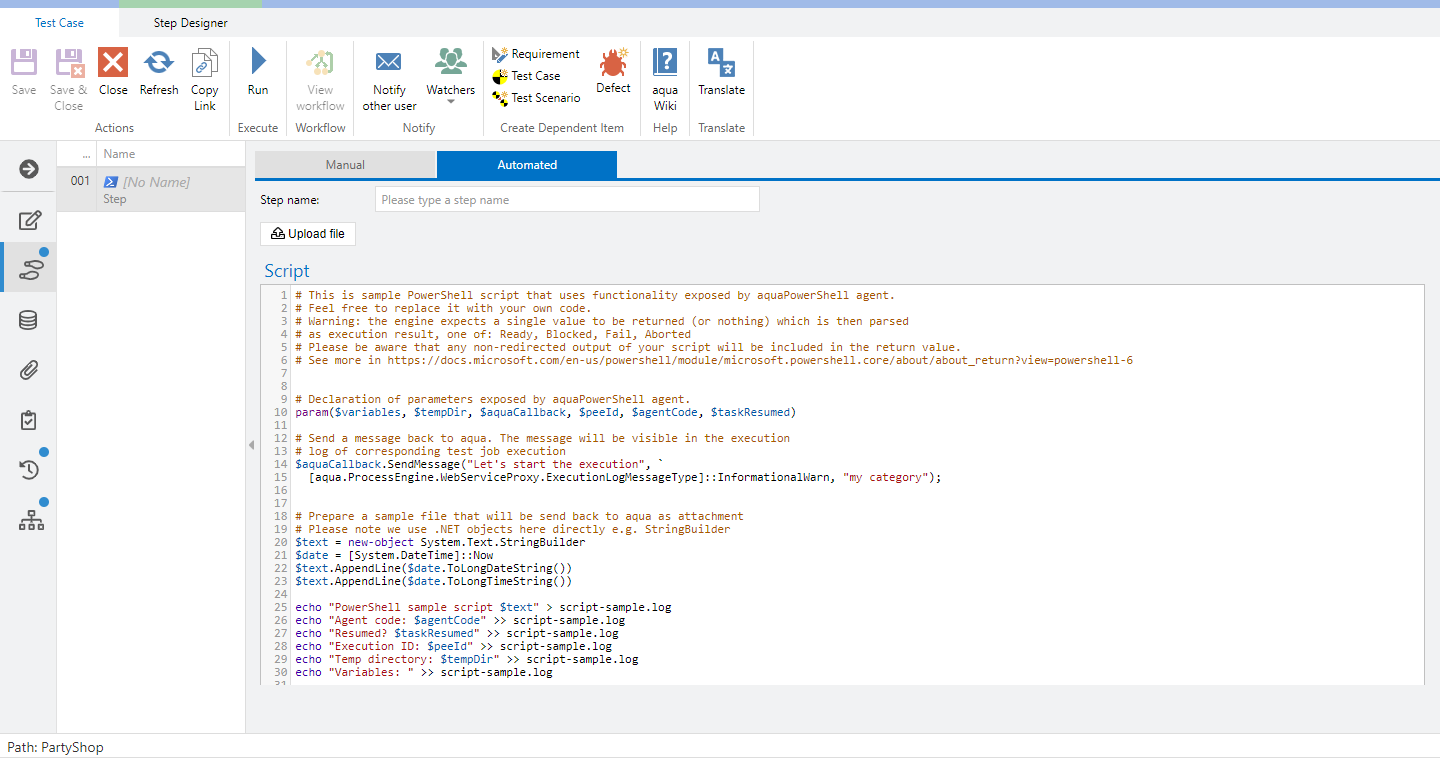
To add a PowerShell script to a test case, open a test case and navigate to step designer. Switch to the tab 'Automation'.

If you now select PowerShell, a sample PowerShell script is automatically inserted. In the sample script you can easily understand the functionalities provided by the PowerShell agent. You can then further customize the script or replace it directly with other scripts.
Here is some more information on the objects and functions provided by the PowerShell agent for PowerShell scripts:
- variables – array of objects containing TC variables (and their values) used for execution. Name and Value are the most important properties of each object.
- tempDir – string variable containing path of the temporary directory where the script attachments have been saved (if applicable).
- aquaCallback – reference to AquaShellCallbackHelper object that can be used to communicate with aqua from within the PowerShell script. Available functionalities includes:
- sending log messages to aqua (also with screenshots)
- sending attachments to aqua (saved as attachments in the execution object)
- sending execution status via AddExecutionData
- retrieve test execution information (Ids of project, test case, test execution, test scenario, test scenario execution)
- StopRequest property - set by agent on abort requests received from aqua. Long-running scripts should periodically check this flag and stop gently in case when set. If not stopped in 5 seconds after the flag is set, agent does a forced stop of the running script.
To call nunit by PowerShell you can use commands like:
$output = & $nunitLocation $testDll --test=$testCaseName 2>&1
To use exposed objects, PowerShell script needs to declare their usage by issuing the following command:
param($variables, $tempDir, $aquaCallback)
Note that all used variables must be declared in a single “param” command.
Sample script using those objects:
# Sample PowerShell script that uses .NET objects and TC variables from aqua
param($variables, $tempDir, $aquaCallback)
$text = new-object System.Text.StringBuilder
$date = [System.DateTime]::Now
$text.AppendLine($date.ToLongDateString())
$text.AppendLine($date.ToLongTimeString())
echo "$text" > script-sample.log
foreach ($var in $variables)
{
$varName = $var.Name
$varValue = $var.Value
echo "Variable: $varName : $varValue" >> script-sample.log
}
#Request Test Execution information via $aquaCallback.GetExecutionInfo()
#Returns an oject with ProjectId, TestCaseId, TestExecutionId, [TestScenarioId and TestScenarioExecutionId]
$executionInfo = $aquaCallback.GetExecutionInfo()
Write-Output "Project ID: $($executionInfo.ProjectId)" >> script-sample.log
Write-Output "TestCase ID: $($executionInfo.TestCaseId)" >> script-sample.log
Write-Output "Execution ID $($executionInfo.TestExecutionId)" >> script-sample.log
Write-Output "Scenario ID (when run in scenario): $($executionInfo.TestScenarioId)" >> script-sample.log
Write-Output "Scenario Execution ID (when run in scenario): $($executionInfo.TestScenarioExecutionId)" >> script-sample.log
# Possible Types of [aqua.ProcessEngine.WebServiceProxy.ExecutionLogMessageType]
# SUTError, ScriptExecutionError, PreparationError, ExecutionError, InformationalInfo, InformationalDebug, InformationalWarn, InformationalSuccess
$aquaCallback.SendMessage("hello, I was sent from script", [aqua.ProcessEngine.WebServiceProxy.ExecutionLogMessageType]::InformationalWarn, "my category");
$aquaCallback.SendMessageWithScreenshot("and this is Screenshot", "c:\sample.jpg", [aqua.ProcessEngine.WebServiceProxy.ExecutionLogMessageType]::InformationalWarn, "my category");
dir $tempDir >> script-sample.log
$aquaCallback.AddExecutionAttachment("script-sample.log");
while ($true)
{
if ($aquaCallback.StopRequest)
{
$aquaCallback.SendMessage("Aborting on StopRequest", [aqua.ProcessEngine.WebServiceProxy.ExecutionLogMessageType]::InformationalWarn, "my category");
return "Aborted"
}
Start-Sleep -s 10
aquaCallback.SendMessage("Looping in PowerShell…", [aqua.ProcessEngine.WebServiceProxy.ExecutionLogMessageType]::InformationalWarn, "my category");
}
# Return status of script execution. One of: Ready, Blocked, Fail, Aborted
return "Ready"
Upload File
Using the Upload file button, you can add files to the automated PowerShell step, which are then automatically downloaded during execution and stored in the temp folder of the agent in which the script is also executed. This allows you to easily use these files within the script.
In addition, files can also be uploaded during script execution and attached to the execution. This is done with the following call: $aquaCallback.AddExecutionAttachment("Filepath")
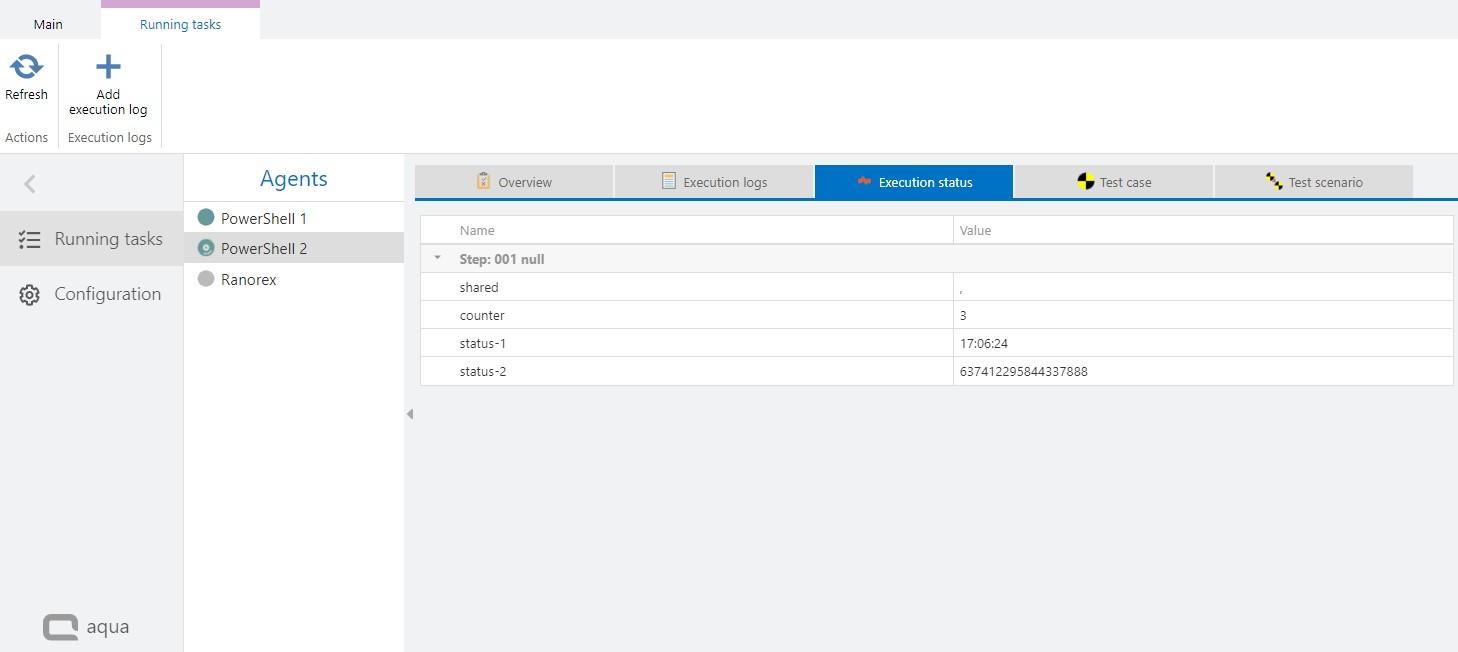
Execution Status
PowerShell automation provides the capability to set an execution status of a given list of parameters that can be updated from time to time. This is helpful if you have a long running test execution and want to show an intermediate status in aqua, e.g. progress in percent or number of checks performed so far. Sample code how to do this is given below.
# sending multiple values as execution status
$attributes = @()
$attribute = New-Object aqua.ProcessEngine.WebServiceProxy.ExecutionDataAttribute
$attribute.AttrName = "dummy"
$attribute.AttrType = [aqua.ProcessEngine.WebServiceProxy.ExecutionDataAttributeType] "Integer"
$attribute.AttrValue = "14"
$attributes += $attribute
$attribute = New-Object aqua.ProcessEngine.WebServiceProxy.ExecutionDataAttribute
$attribute.AttrName = "dummy2"
$attribute.AttrType = [aqua.ProcessEngine.WebServiceProxy.ExecutionDataAttributeType] "String"
$attribute.AttrValue = "HelloWorld"
$attributes += $attribute
# if second parameter is true, execution status is replaced entirely with the given array. In contrast, false does a partial update
$aquaCallback.AddExecutionData($attributes, $true)
# sending single value as execution status
# $aquaCallback.AddExecutionDataString(string name, string value)
$aquaCallback.AddExecutionDataString("Progress", "50%")
# $aquaCallback.AddExecutionDataInteger(string name, int value)
$aquaCallback.AddExecutionDataInteger("No. of Checks", 50)
Transfer information between steps
Two automated step in aqua are running independent of each other. Thus, you are not able to access data from one automated step in a subsequent step by default. To solve this issue, you can use the execution status to hand over some data from one automated step to another.
# $aquaCallback.GetAllExecutionAttributesInExecution()
$allAttributes = $aquaCallback.GetAllExecutionAttributesInExecution()
# $aquaCallback.GetExecutionAttributeInExecution(string attributeName)
$progress = $aquaCallback.GetExecutionAttributeInExecution("Progress")
# $aquaCallback.GetExecutionAttributeValueInExecution(string attributeName)
$noOfChecks = $aquaCallback.GetExecutionAttributeValueInExecution("No. of Checks")
Here is a minimal example for the transfer and output of a string between two steps:
In step 1:
$aquaCallback.AddExecutionDataString("SharedStringVariable","this is the content of the string variable from step 1")
In step 2:
$aquaCallback.SendMessage($aquaCallback.GetExecutionAttributeValueInExecution("SharedStringVariable"),[aqua.ProcessEngine.WebServiceProxy.ExecutionLogMessageType]::InformationalInfo, "my category");
$aquaCallback.SendMessage($aquaCallback.GetExecutionAttributeValueInExecution("SharedStringVariable"),[aqua.ProcessEngine.WebServiceProxy.ExecutionLogMessageType]::InformationalInfo, "my category");
Unix Shell
The UnixShell-Agent allows to execute a Shell-Script on a remote Unix (Linux) machine. In order to setup the Unix-Shell-Agent, please follow the next steps.
Setup
The following steps require fundamental knowledge about the UnixShell. The given commands are not guaranteed to work on any Unix (Linux) distribution and need to be adopted according to your distribution.
- Create an automation agent in aqua and write down the Access key (also known as Agent code)
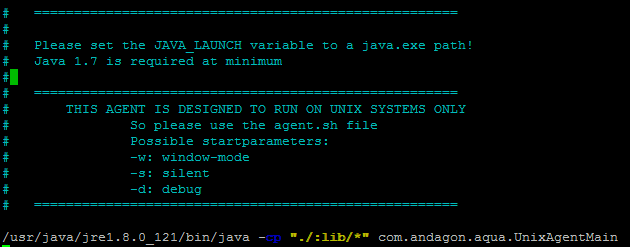
- Check if Java is installed on the target Unix (Linux) machine, e.g. by running the following command:
java -version
The result should be similar to the following screenshot:
If java is not installed on your target machine, you can install java by following the guidelines for your Unix (Linux) distribution. As an alternative, you can download a java runtime environment (jre) as *.tar.gz package and untar it to a folder of your choice. The following commands are examples for an Ubuntu distribution:
mkdir /usr/java
cd /usr/java
tar zxvf <path-to-your-java-tar.gz>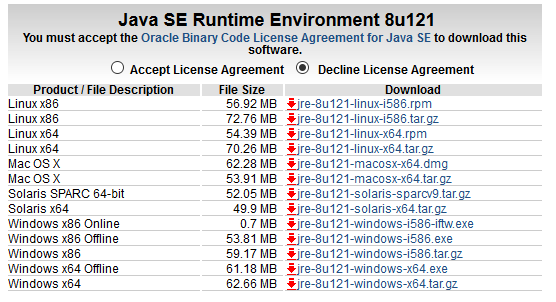
- Upload aqua UnixShell-agent to your Unix (Linux) machine and unzip it to a folder of your choice (e.g. using unzip command in Ubuntu that can be installed via sudo apt-get install unzip).
cd /usr
unzip <path-to-UnixShell-agent-zip-file>
- Edit the file agent.properties (e.g. using command nano) and change the line agentCode (see step 1) as well as aquaServiceUrl so that the agent can communicate with your aqua Server.
cd <path to agent folder>
nano ./agent.properties
An example can be seen below.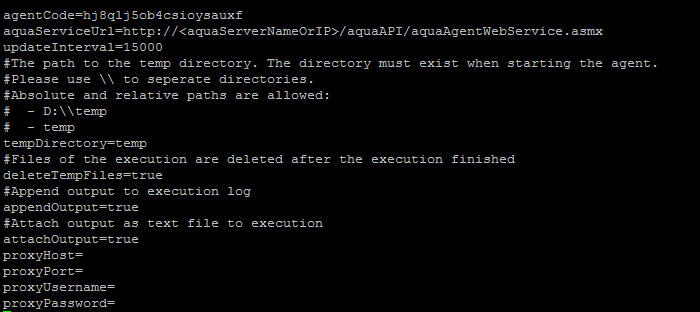
- If you installed java following the alternative approach as described in Step 2, please edit the file agent.sh and adopt the path to the java command. Please note the option to run agent in window-mode. This might be suitable for Unix (Linux) machines that have a GUI installed.
- Make the file agent.sh executable.
sudo chmod +x ./agent.sh
- Start agent by running agent.sh.
cd <path to agent folder>
./agent.sh
When an exception occurred, please check file agent.properties again, if agentcode and aquaServiceUrl is set properly.
In aqua, you should see a green indicator for your agent.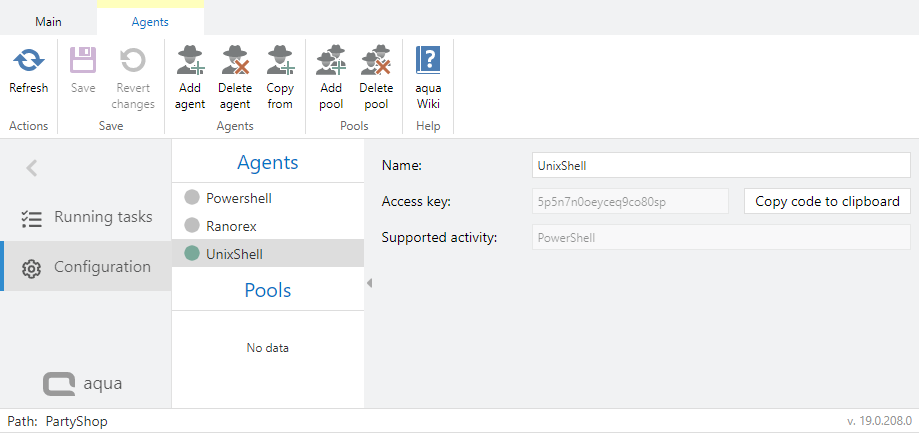
Writing Shell-Scripts that return results to aqua
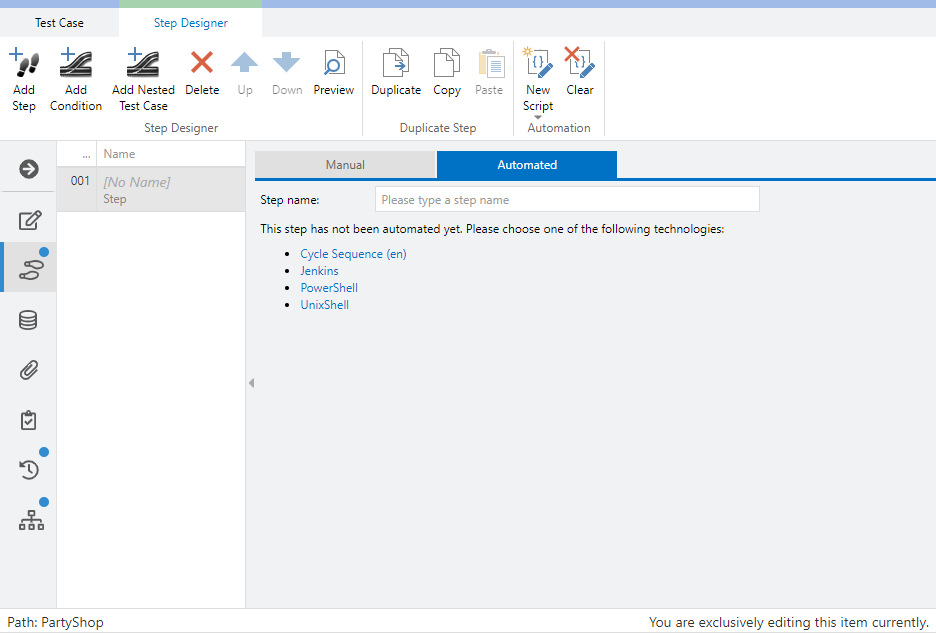
In order to run a UnixShell-Script in aqua, create a new test case, open Step Designer and select tab Automation. Select the test step (click the empty space of the given step) and add a new UnixShell-Script.
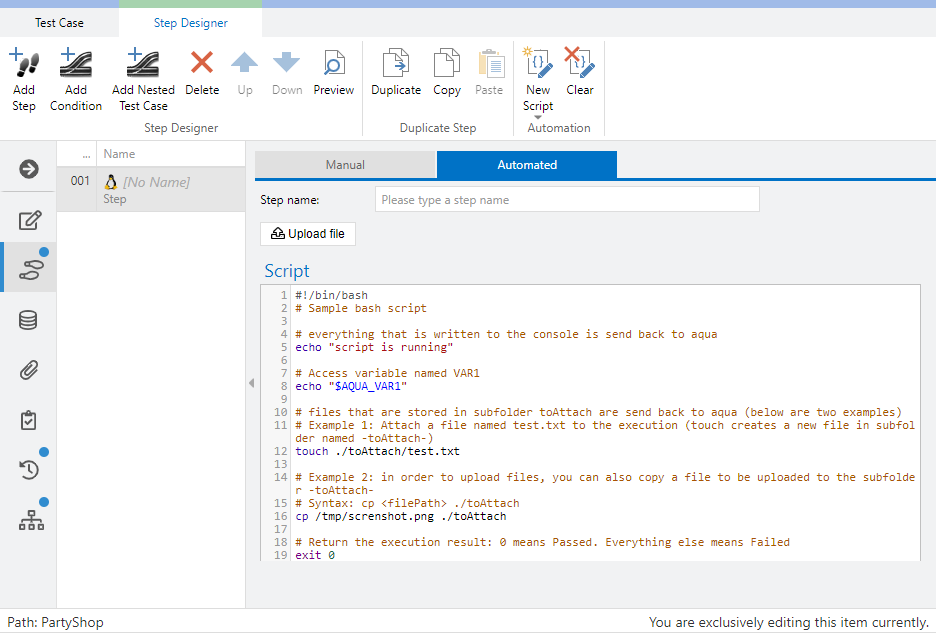
In the Script-area of the step you are able to insert the script to be run on the remote machine. An example is given below:
##################
#!/bin/bash
# Sample bash script
# everything that is written to the console is send back to aqua
echo "script is running"
# Access variable named VAR1
echo "$AQUA_VAR1"
# files that are stored in subfolder toAttach are send back to aqua (below are two examples)
# Example 1: Attach a file named test.txt to the execution (touch creates a new file in subfolder named -toAttach-)
touch ./toAttach/test.txt
# Example 2: in order to upload files, you can also copy a file to be uploaded to the subfolder -toAttach-
# Syntax: cp <filePath> ./toAttach
cp /tmp/screnshot.png ./toAttach
# Return the execution result: 0 means Passed. Everything else means Failed
exit 0
##################
When you are done with your script, you can save and run your test case.
For the execution, a new subfolder is created in the temp-Folder of the agent. In this subfolder, another subfolder toAttach is created automatically so that you are able to upload attachments as given in the example. If you want to see the temp-Folder after execution, please set deleteTempFiles=false in file agent.properties and restart your agent.
Upload File
Using the Upload file button, you can add files to the automated UnixShell step, which are then automatically downloaded during execution and stored in the temp folder of the agent in which the script is also executed. This allows you to easily use these files within the script.
In addition, files can also be uploaded during script execution as mentioned above.
Limitations
- Images can be uploaded as attachments. However, uploading images so that they are directly visible in the aqua execution log is not possible so far.
- Complete output of the console is written to the last step in the execution log and not written as multiple execution log entries.
- As a consequence of limitation 2, you can not control the log level of a single execution log message.
Jenkins Integration
For interactions between aqua and Jenkins, the famous open source tool for continuous integration, andagon has developed a plugin that can be installed in Jenkins and which allows you to trigger Jenkins jobs from aqua and vice versa, that is, to trigger test scenarios in aqua from a Jenkins job. Unit test results can also be written back to aqua as well so that they can benefit from aqua's powerful reporting engine. Furthermore, aqua links can be parsed from a repositories’ comments (e.g. Subversion or Git) and are shown in Jenkins. This chapter describes in detail the required steps to set up and configure the integration with Jenkins.
Installation
Note 1: Before starting the installation of the Jenkins plugin, please ensure that you have the right Jenkins plugin corresponding to your aqua installation version number and your Jenkins installation version number. If you are not sure, please contact our support team.
Note 2: This installation guide is based on Jenkins version 2.73.3 and aqua 18.1.
Installing the aqua Jenkins Plugin
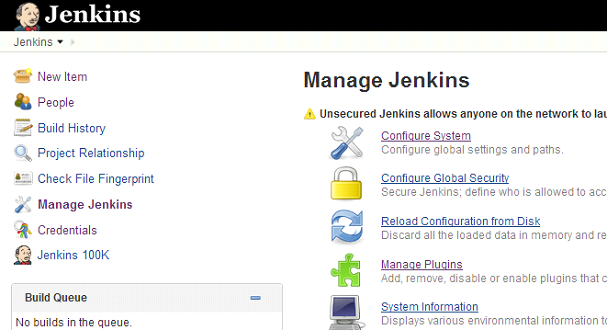
The Jenkins plugin is not available from the Jenkins Plugin Store. The Jenkins Plugin is delivered as a file named "aquaJenkinsPlugin.hpi" and can be downloaded from the aqua homepage. To install this plugin, please open the Jenkins dashboard and choose Manage Jenkins on the left hand side. Then select Manage plugins located in the centre.
On the website that now appears, please select tab Advanced and upload the plugin manually.
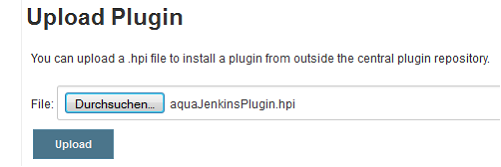
After successful installation you should see an entry below the Installed tab called aquaJenkinsPlugin.
Configuring the Jenkins plugin
To configure aqua’s Jenkins plugin, please open the Jenkins Dashboard and choose “Manage Jenkins” on the left hand side navigation menu. Then choose “Configure System” from the middle.
Scroll down to the following section named “Aqua Plugin”:
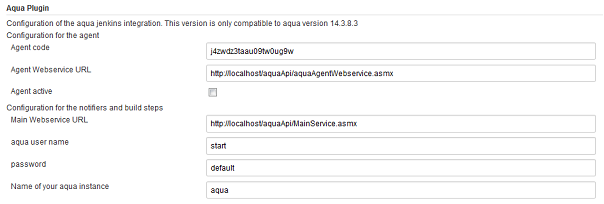
As you can see in the screenshot, the plugin requires the following information:
Agent code | An agent code that identifies the plugin in your aqua installation. Retrieve this code by opening aqua. Right-Click the corresponding project and choose “Project Configuration” => “Automation”. On the appearing window add a new agent, call it Jenkins (or similar) and save your settings. |
Agent Webservice URL | The Webservice URL for aqua Agents. Retrieve this information from your administrator. You can check this URL by opening the URL in your browser. You should see a website entitled “aquaAgentWebservice”. |
Agent active | This activates your Jenkins Plugin. |
Main Webservice URL | The common Webservice URL for retrieving test cases. Retrieve this information from your administrator. You can check this URL by opening the URL in your browser. You should see a website entitled “MainService”. This is only used for the direction Jenkins -> aqua |
aqua user name | A valid aqua user name that is used for authentication. This is only used for the direction Jenkins -> aqua |
Password | The corresponding password that is used for authentication. This is only used for the direction Jenkins -> aqua |
Name of your aqua instance | The name of your aqua instance can be found by opening your aqua Client. The footer shows the appropriate information, in our case “aquatest-oracle”. |
When you have completed your settings, please save them by clicking Save in Jenkins. You can check if your settings have been successful by opening your aqua Client.
Triggering Jenkins Jobs from aqua
For triggering a job in Jenkins from aqua please create a new test case in aqua. Give your new test case a name and open Steps from the gray bottom bar. Now choose tab Automation and add a new Jenkins Script to the corresponding test step with button New Script. In the input field called Script simply add the name of the job in Jenkins.

When you are done, save your test case and execute it.
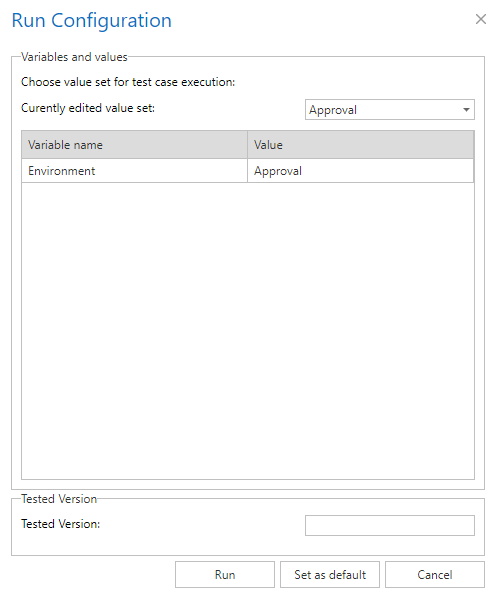
Note: A Jenkins job can be parameterized. If you want to overwrite a specific parameter, e.g. Environment, you can parameterize your aqua test case (see Data section in gray bottom bar. When triggering the given Jenkins job via aqua, the given value, e.g. Approval, is set properly in Jenkins.
aqua Testjob Trigger: Triggering Execution of Test Scenario’s from Jenkins
aqua test scenarios can be triggered by Jenkins. This is a suitable way to execute your automated tests in aqua after a successful build in Jenkins. To add this trigger, add a build step called aqua Testjob Trigger. This adds the following form to your Jenkins job.
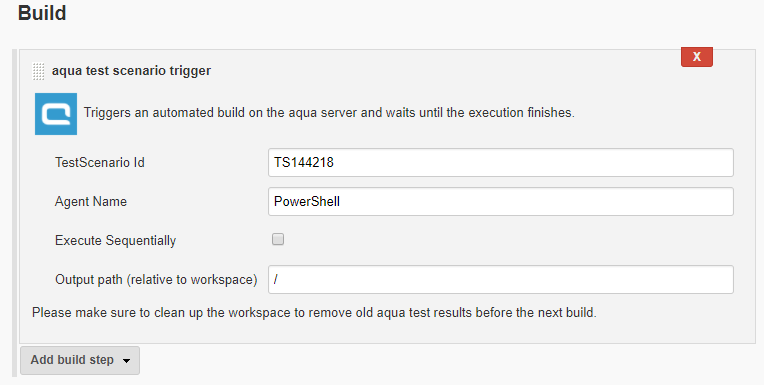
As you can see in the screenshot, the aqua Testjob Trigger requires the following information:
TestScenario Id | The aqua Id of the test scenario you want to be executed |
Agent Name | The default automation agent the test scenario should use (can be empty, but then ensure that each test case in your test scenario is assigned an appropriate agent for execution, otherwise it will fail) |
Execute Sequentially | Execute test cases of your test scenario sequentially |
Output Path | A Jenkins output path for your test results, where results are stored in Unit-Test format so that Jenkins can also show test results. |
aqua Notifier: Writing Unit Test Results from Jenkins to aqua
Unit test results are shown in Jenkins. However, to get access to this information in aqua, you have the option to write back the results into a template test case in aqua.
The first step is to create this test case in aqua. Open a new test case, give it a name, e.g. “Unit test results”, then save and close the test case.
Then go to your Jenkins Job, add a new Postbuild Action called aqua Notifier” and enter the Id of your aqua test case.
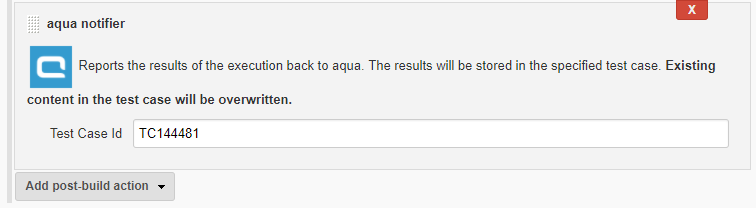
When executing this Jenkins job now, your Unit test results are written to your aqua test case and stored as a new execution in this test case. Please be aware that in addition to the creation of a new test execution, the test description and all test steps are replaced with the information from Jenkins, every time the Jenkins job is executed. Therefore any information stored in the test case description or test steps will be replaced. Do not save the Unit test results into the same test case that triggers a Jenkins job!
You can also use a variable for the Test Case Id (e.g. $TestCaseVariable) if you have a parameterized Jenkins job and want to store the results in different test cases in aqua. For this purpose, all test cases from the variable values must exist in aqua.
You can also use a variable for the Test Case Id (e.g. $TestCaseVariable) if you have a parameterized Jenkins job and want to store the results in different test cases in aqua. For this purpose, all test cases from the variable values must exist in aqua.
aqua Links: Showing aqua Links in Jenkins
The Jenkins plugin can analyze commit messages from Subversion or Git. If the comment contains a link to an item in aqua, they are parsed and shown in Jenkins.
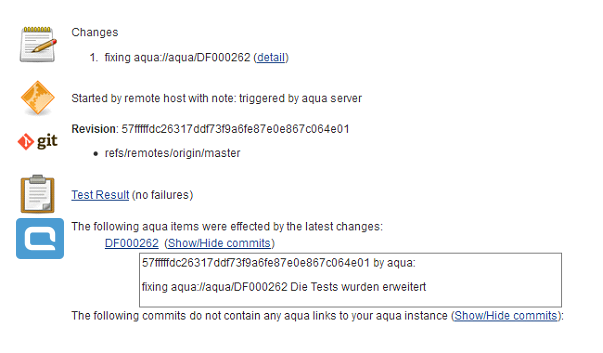
To configure aqua Links, go to your Jenkins Job and add a new Postbuild Action called aqua Links.

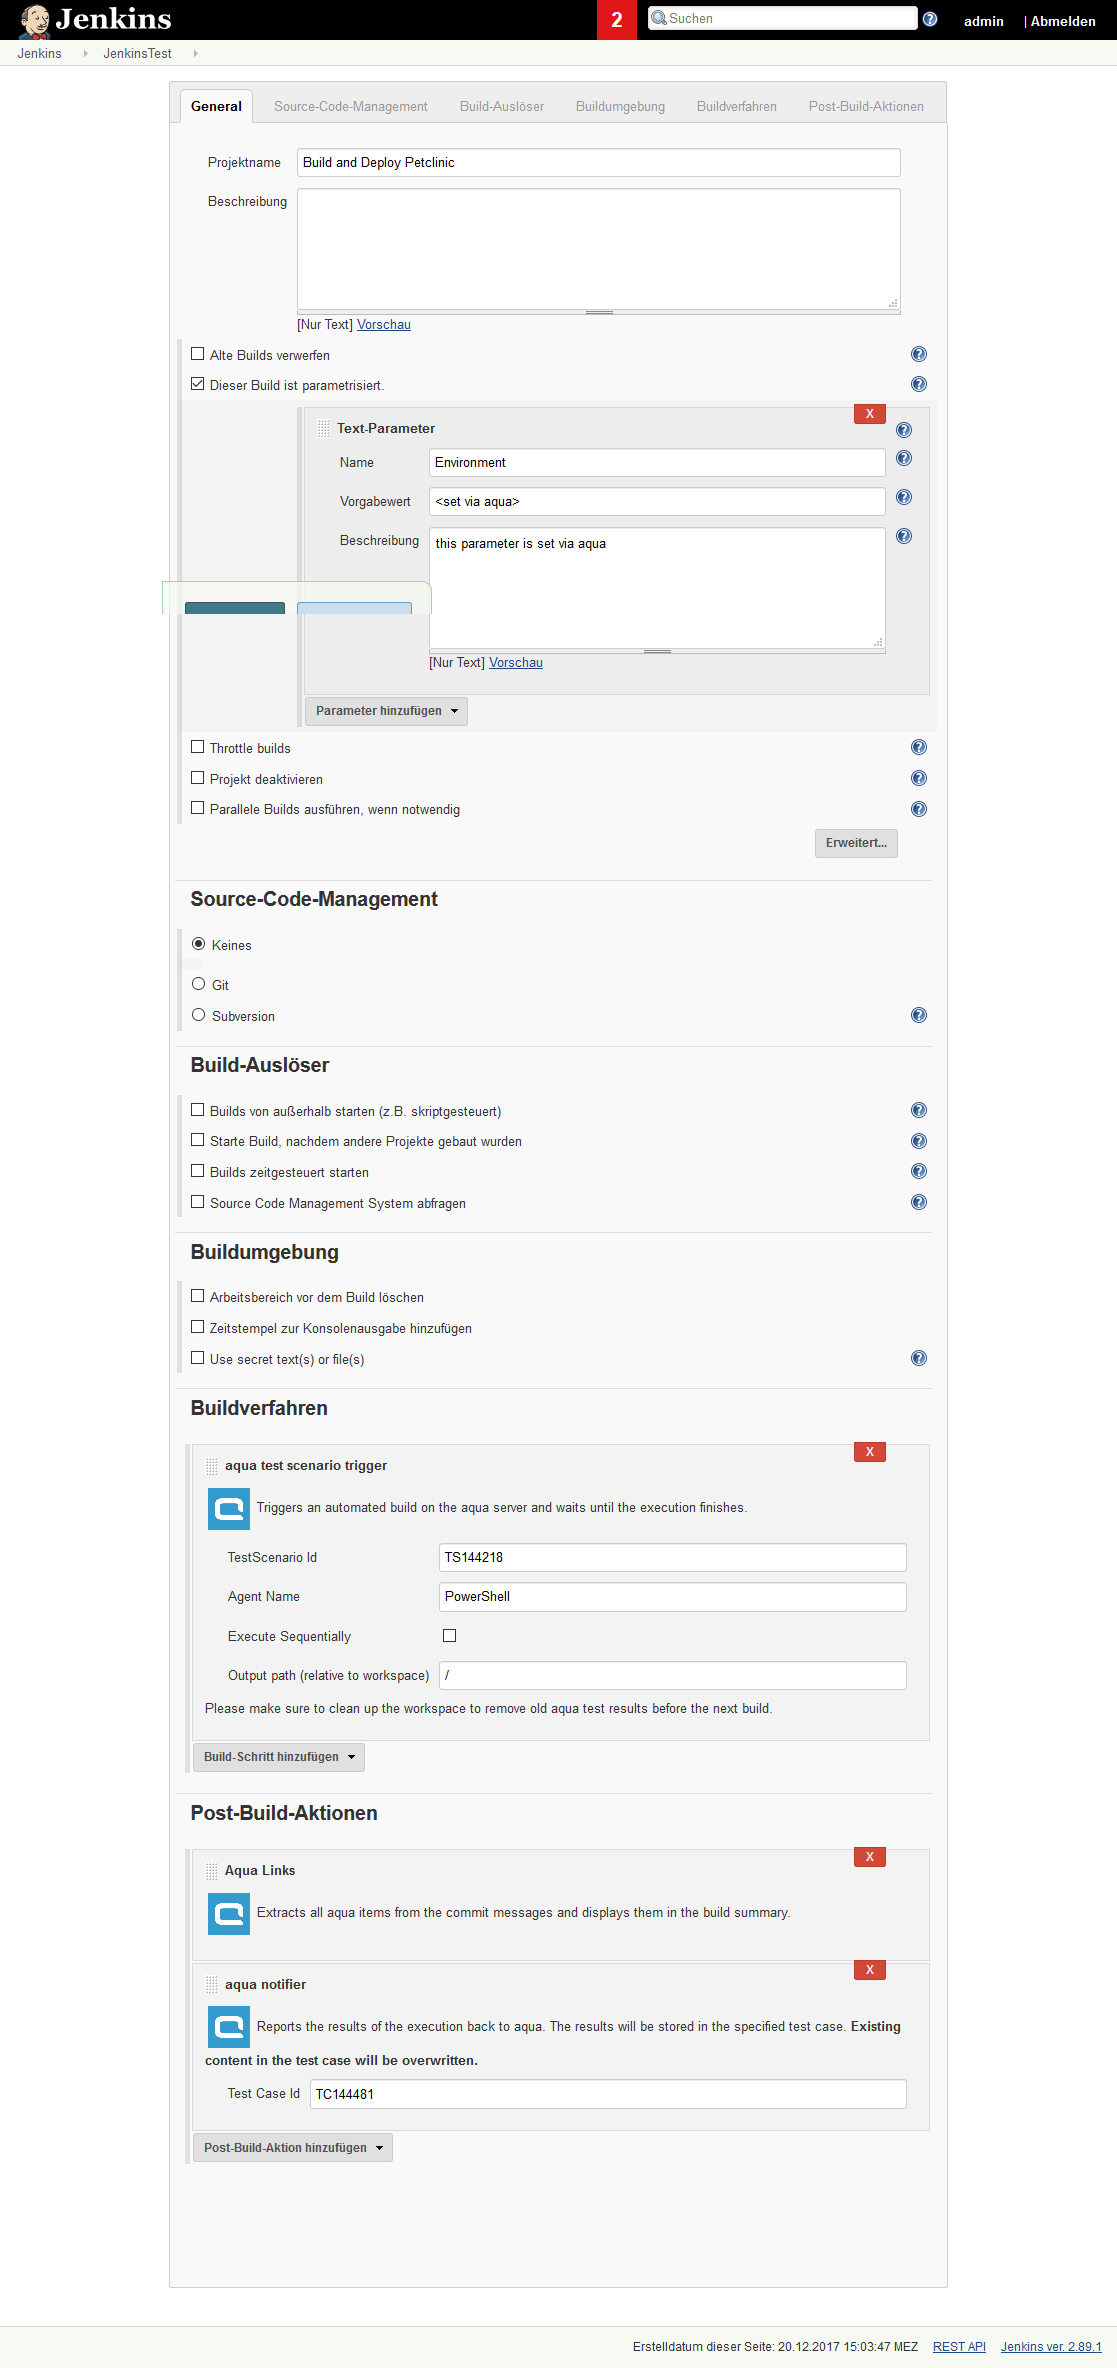
A Sample Jenkins Job Containing all aqua Elements
The following screenshot contains a sample Jenkins job with configuration of aqua Testjob Trigger, aqua Notifier and aqua Links
Related Articles
Configure Automation (Rich Client)
To automate tests with different tools you may need a third party tool. The location of these third party tools and a temporary directory for automation needs to be given to aqua. To do so, click File -> Options. Select Automation and browse for the ...Automation Library (Rich Client)
In aqua you have the option to reuse test automation scripts by using a library. That enables a user to store test scripts in a cloud and to use it in different test cases. A test script in a library can be reused in different test cases and test ...Test Scenarios
With test scenarios, test cases can be grouped for a specific execution purpose and executed from within the scenario. An alternative terminology for test scenario could also be test plan or test set. The test cases inside the test scenario are not ...Creating an Automation Agent (Rich Client)
To run the test case a corresponding aqua agent must be configured. Each agent has an individual access code. The code is generated in aqua and assigned to the agent. To do this, click on aqua in the main window then select -> Project Configuration ...Test It!
The Test It! feature allows you to instantly test items with related test cases or scenarios. To do so, open an item, e.g. a requirement, with related test cases or test scenarios. Click on the button on the ribbon. If no test case or test scenario ...