UFT (Rich Client)
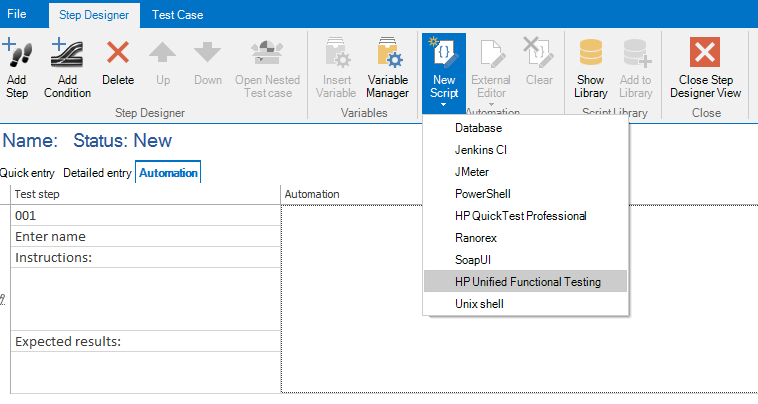
First, you go into a test case and click on Automation. Here, you can add a UFT script. The script needs to be done in UFT itself. aqua allows you to import the UFT solution, with its data table and action. Take a look at system requiremnts to look for supported versions.

After adding the script, you have the option to import your existing UFT solution.

In order to run the test, you need to create the agent accordingly. Then you can start the execution via the Run button. The possible agents for the executions will be selectable in the dropdown. The UFT results will be attached to the execution.
Configure Agent
Extract the UFTAgent-*.zip and open aquaAgentUFTGui.exe.config.
Here you have to set the Agent Code and the ServiceUrl. In the following, you will find an example:
<configuration>
<appSettings>
<add key="agentCode" value="26vmu3aw5etcvuxmop9m"/>
<add key="aquaServiceUrl" value="http://localhost/aquaAPI/aquaAgentWebService.asmx"/>
<add key="keepAliveSendingFrequencyMs" value="30000"/>
<add key="proxyHost" value=""/>
<add key="proxyPort" value=""/>
<add key="proxyUsername" value=""/>
<add key="proxyPassword" value=""/>
<add key="maxGUILogEntries" value="30"/>
<add key="tempDirectory" value="temp"/>
</appSettings>
<startup>
<supportedRuntime version="v4.0" sku=".NETFramework,Version=v4.7.2"/>
</startup>
<system.web>
<membership defaultProvider="ClientAuthenticationMembershipProvider">
<providers>
<add name="ClientAuthenticationMembershipProvider" type="System.Web.ClientServices.Providers.ClientFormsAuthenticationMembershipProvider, System.Web.Extensions, Version=3.5.0.0, Culture=neutral, PublicKeyToken=31bf3856ad364e35" serviceUri=""/>
</providers>
</membership>
<roleManager defaultProvider="ClientRoleProvider" enabled="true">
<providers>
<add name="ClientRoleProvider" type="System.Web.ClientServices.Providers.ClientRoleProvider, System.Web.Extensions, Version=3.5.0.0, Culture=neutral, PublicKeyToken=31bf3856ad364e35" serviceUri="" cacheTimeout="86400"/>
</providers>
</roleManager>
</system.web>
</configuration>
Related Articles
Web Client vs Rich Client
Feature Additional Info WebClient Rich Client Homescreen x x Configurable Only on premise x User administration x x Roles x x Creation x x Project x x Usage statistics x SAML 2.0 x Project configuration x x Fields x x ...Rich Client
System Requirements – aqua Rich Client Minimum software and hardware requirements are: Intel Core Duo 2x2Ghz, AMD Duo Core Processor 2x2Ghz or more 4 GB RAM or more 1 GB free hard disk space Windows 10, Windows 8.1, Windows 8, Windows 7 Microsoft ...Step Designer (Rich Client)
The step designer allows to create steps and conditions to create manual test steps and to extend it with automated tests. A default test condition and a test step are available. Conditions have an instruction field that can be specified, ...Jenkins Integration (Rich Client)
For interactions between aqua and Jenkins, the famous open source tool for continuous integration, andagon has developed a plugin that can be installed on Jenkins and which allows you to trigger Jenkins jobs from aqua and vice versa, that is, to ...Clearing Cache Manually (Rich Client)
Sometimes, it is helpful to clear the aqua Client's cache manually. You can do this inside aqua via Options menu. Alternatively, close aqua and navigate to the following path: %localAppData%\andagon_GmbH Please delete all files and sub-folders.